
In this article, I’d like to help you get started with setting up a Facebook group that will add new leads, sales, and profits to your business.
This article is all about setup, and in my next article I’ll go deeper into how to consistently generate sales and promotion – but first, we need to handle the fundamentals to make sure your group is properly set up to help you bring in leads, make sales, and grow your pipeline.
If you’re a marketer than you already nearly everyone online has a Facebook account, but what you likely don’t know is that most people on Facebook are there for business-related purposes – so a group can be a great way to engage your customers and leads in a non-salesy way.
If you’ve already read my article on Entrepreneur Magazine discussing how I make 6-Figures a year with Facebook, then you know that Messenger is one of the ways – and today I’d like to show you another way that keeps my business thriving (and that of many other well-known marketers and business owners).
To get us started let’s go through the steps of setting up your brand spanking new group (and if you already have a group you can jump ahead to step 6).
From here on out, let’s assume you’re doing this from your laptop or desktop. Of course, you can do all this from a phone, but it’ll be much easier from a computer.
Step One: Create Your Group
When you’re on your computer, look at the left scroll bar and scroll to the bottom. Here’s what it looks like on my Macbook screen. I want you to click where I’ve put arrows.
Click on the word, “Groups” and on the next page click on the big green button to “Create Group.”
Here’s a simple little video showing you what I’m talking about. (Just watch the first 40 seconds. I’ll tackle the rest for you and do it better than this video from Facebook).
Step 2: Your Group Thrives On Its Name
When you pick a name for your group, choose one that includes a keyword that quickly tells people what your group is for and who it’s for.
In the title use a word that works well with your topic.
If your group is about fitness, use ‘fitness’ in the title. Or if your group is for podcasting, you can use the word – podcasting, podcaster, or something like that in the title.
By using your keyword in the title, it’ll help people who are searching for that topic to find your group, and it’ll let them know your group is for them.
If I go into Facebook and am looking for a marketing group, but your group doesn’t quickly tell me it’s for marketers and about marketing – then I may choose a different group or Facebook may not even show it to me at all.
One example of a group that has used a keyword and exploded is Sales Talk With Sales Pros. The name makes it pretty clear who’s it, what it’s about, and what you’ll get in the group. If you go into Facebook and type in ‘sales,’ it’s likely that the group will come up as a suggestion for you. Meanwhile, other sales groups that don’t use that keyword won’t come up.
Similarly, I’ve named one of my Facebook groups, Podcasters Secret Weapon. Both these titles tell you the niche and focus of the group within the first word.
Use your keyword in your title and help your group be found.
Step 3: For Increased Engagement and Exclusivity, Make Your Group Closed
When you’re creating your group, you’ll also need to select if your group is: public, closed, or secret.
Here’s a picture of the options. I suggest you choose, closed.
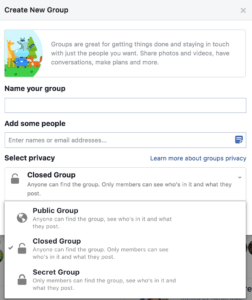 You don’t want to choose public because it gives people no incentive to join. In a public group, anyone goes in, see the posts and comment even. There’s no exclusivity and as we all know in marketing – exclusive breeds interest.
The only reason to choose ‘Secret Group’ is if you don’t want to be easily found or shared (there are very few reasons you’d want your group not to be found by anyone). If you create a special program and it’s a paid for the program, and you don’t want random requests from people, you choose secret, so the group can’t be found unless you send out a link.
If your group is free and it’s meant to be part of your pipeline to help your business – you want people to find your group. You want the group to feel and be exclusive, so by making it private you’ll make it closed, but people can still see it and request to join.
Step 4 – Create Group Rules To Ensure Success In Your Community
Managing a community can be time-consuming. If you want a magic bullet where you can just sleep and never work again – a group isn’t for you, but if you like a strategy that gives you a faucet that streams out leads, buyers, and customers – then Facebook group marketing will help you.
To ensure your success in your community, you want to create rules. To do that, you need guidelines that help assure that you have:
✅Good community members
✅Conversation and engagement in your community
✅Inclusivity and civility among your community
✅Lots of engagement and activity (more on this later)
✅Sharing of knowledge and support among members
✅Fun, excitement, and repeated activity by your members
So, what kind of rules work well?
Well, here’s a few you should consider.
Be respectful. Don’t bully. No racist, sexist, or classist type language that works to alienate, discriminate is allowed. No spam and no marketing your services here – add value and people who want your products or services will recognize your expertise and can reach out if they want what you are selling.
These are some of the rules I’ve found to be useful to have and quite standard across the board.
It’s up to you what kind of rules you want to have, but whatever you decide I suggest you create some group standards and kick people out who don’t live by the rules.
Step 5 – Your Group Picture Matters, kind of…
I’ve put this as step five because I don’t think your group photo matters all that much.
Working with entrepreneurs, I find it’s all too easy for us to get caught up in finding the perfect fonts and images – but that stuff isn’t as important as the content and experience you give people.
If you have branding, use that in your group picture – it’s one more way to help sear the logo and colors of your business into the minds of people.
If you don’t have all that, go into Google and find a photo that works. The size of the picture makes a difference, so play around with sizes, and you’ll find something that works. I’ve learned that if I search for large, high-quality photos on Google, I can always use a photo that suits my needs.
Step 6 – Here’s How To Grow and Promote Your Facebook Group
Now you’ve got your group ready and set up in an optimized way to get members, so now it’s time to get people into your community.
When it comes to promotion, my advice is to start telling the world about your group any way you can – and here are some methods to help you do that well.
Start by announcing it to your most immediate community online. That group is going to be people who are on Facebook and are your friends, your email list if you have one, and people who follow you on other social media channels.
Here’s an example of what I’ve done on Twitter and added a few hundred people by Tweeting this out and messaging people who seem like a good fit for my Podcasters Secret Weapon group.

You can do the same thing on all your other social media channels. As you go onto other platforms and mediums to promote your group, I suggest you use the best practices there.
For example, on Twitter, I’m limited on the number of words and characters I can Tweet, but on Facebook, I can use a lot more words – on there I like to be more descriptive, and I like to use stronger copy to entice my friends and followers to join the group.
If you’re wondering why someone from Twitter might join your group, or why someone might leave Instagram to your join your group – consider that most people who use social media have multiple accounts and each place has its pros and cons. With your group, you’re giving people a chance to have a new and cooler experience on Facebook.
One little ninja trick I like using on Twitter is using an app called, Post Planner. With Post Planner I’ve set up a weekly Tweet where I invite people to join my Facebook group. Since the lifespan of a Tweet is 20 minutes, I’ve found that tweeting the same thing once a week doesn’t hurt my account or annoy my fans.
Step 7: Make Posts Welcoming Your New Members – And Drive Engagement Up
The key to your group lies in being able to keep members engaged.
Online engagement is king. If you can get members active, you will keep them returning to your group and thus creating a reason for them to see you, interact with you, and you’ll nurture leads to a sale faster this way.
When you’re first starting out – and even if you have a group, you need to make sure your new members come into the group and participate.
The best way to create engagement with new members is by welcoming them to the group.
A simple post that says:
“Hey group, let’s welcome (NAME + Tag them) to the group.
Welcome to our community, Name, please say hello.
Also, what are your goals with (use a question to get the new person to comment)”
End of invite post. A short simple welcome to invite the new member(s) to come and use their new group.
Step 8: Post Daily Or A Few Times A Week
If your goal is to have an active community and a steady pipeline of leads – then posting on a regular basis will be essential.
When you post your members will see the post, and in turn, they’ll feel compelled to post and participate in the community.
By posting often you’ll encourage your community also to be active.
Post and respond to the posts of members.
You don’t have to respond to everything, but posting on a regular basis is essential to your group’s success.
As you post day after day, you’ll start to get the hang of what works and what doesn’t. Not only that, you’ll create an intimate bond with your community, and they’ll look forward to your posts.
Along with creating a better connection, by checking in on your group, you’ll also start to see what your market wants.
As you watch your community, you can extract a ton of essential information to help you make products, courses, and services that your community wants – but first, it starts with you being engaged and active.
Now, in my next article, I’ll discuss promotion and growth for your group.
But, if you’d like to jump ahead and just take the free video training I’ve created for you to show you how I craft highly profitable Facebook posts and how I’m using Facebook to bring in more money -here’s a free training you can have right now.


Trackbacks/Pingbacks